

BUILDING A HOME WOODY
Building a climbing wall at home is not as difficult as you might think, says Wild Earth Ambassador Nathan McNeil.
Words & Images: Nathan McNeil
(This is an expanded version of a story from Wild #187)
Been climbing for a while and looking to up your home training game? Want the awesomeness of a bouldering gym in the convenience of your home? Sounds like it’s time you built a ‘woody’! “A woody?” you ask. Well, a woody is the eyebrow raising name climbers have given to home climbing walls as they are predominantly made of timber, therefore… woody. Fun, isn’t it? Having finally left the rental game and entered the responsible world of owning a home, I set myself a goal over summer to finally build myself a woody. I recently built a house in the Scenic Rim and it’s a little further of a drive for me to get to the gym on a regular basis and that, combined with a travelling work schedule means that a woody was a great option to keep on top of climbing goals and general climbing fitness.
When James from Wild Mag called to ask me to write on article for the next “how-to” section, we brainstormed a few ideas of topics, none of which included building a woody. It wasn’t until the end of our chat when James asked, “So what did you get up to over the summer break?” I responded with “I built a climbing wall under my house!” “That’s your story,” he said. “Write about that.” So here goes. But I’m actually going to tell two versions of this. The first bit will be incredibly brief, and is for all you who just want the key details, or who have short attention spans (that’s a lot of us, I know). And the second section, which is optional reading, is for those who really want to delve into the nitty gritty.
- Figure out angle and dimensions first based on location and space
- Confirm how it will be constructed with friends or professionals
- Know what you need to buy BEFORE you go to Bunnings
- Mark and confirm T-nut grid layout before doing drilling any holes
- Only drill holes from the front face of the plywood to avoid damage
- Mark framing locations on ply sheets as you are fitting them so you know where the frames are for screwing off
- Be savvy with buying holds and matting. You’ve already spent enough on materials for the build!
Part Two: The Nitty Gritty
Firstly, I’m not a tradie by any means. But I do consider myself handy enough with tools, and with a background in design, I figured I could tackle it on my own. If you don’t own any tools and have no clue how to use a saw, maybe ring a mate who does or just keep your gym membership instead as a bit of basic knowledge and skill is certainly required. That said, here’s a list of some of the gear you’ll need at a minimum:
- Circular saw
- Impact drill
- Driver drill
- Electric sander
- Level
- Set square
- Measuring tape
- Chalk line
- Various drill bits, screws, bolts etc
If you’ve got all the above and know how to use them, read on…
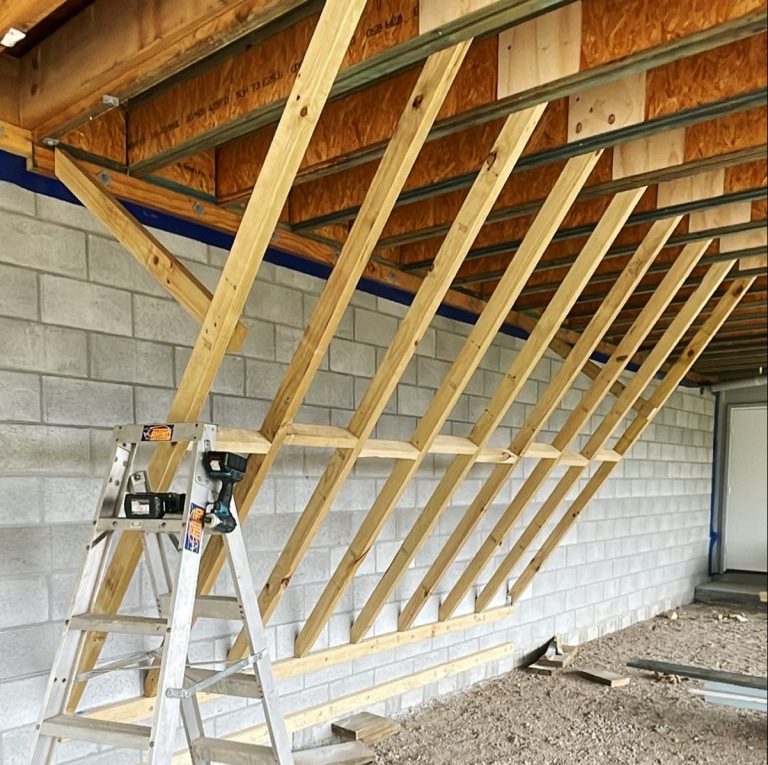
Now, there’s a bunch of ways to build a woody and a lot of the design of your woody will depend on where you plan on putting it, and if it will be freestanding or attached to something. I have a big space under my house that we plan on building into an additional room somewhere down the track and it’s the perfect spot for a large woody because there’s a core filled concrete block retaining wall to attach the base to and the beams for the house above to attach to also. This means it will be solid as a brick shitter and I don’t have to worry about any upright supports; like what you would need to build a freestanding wall.
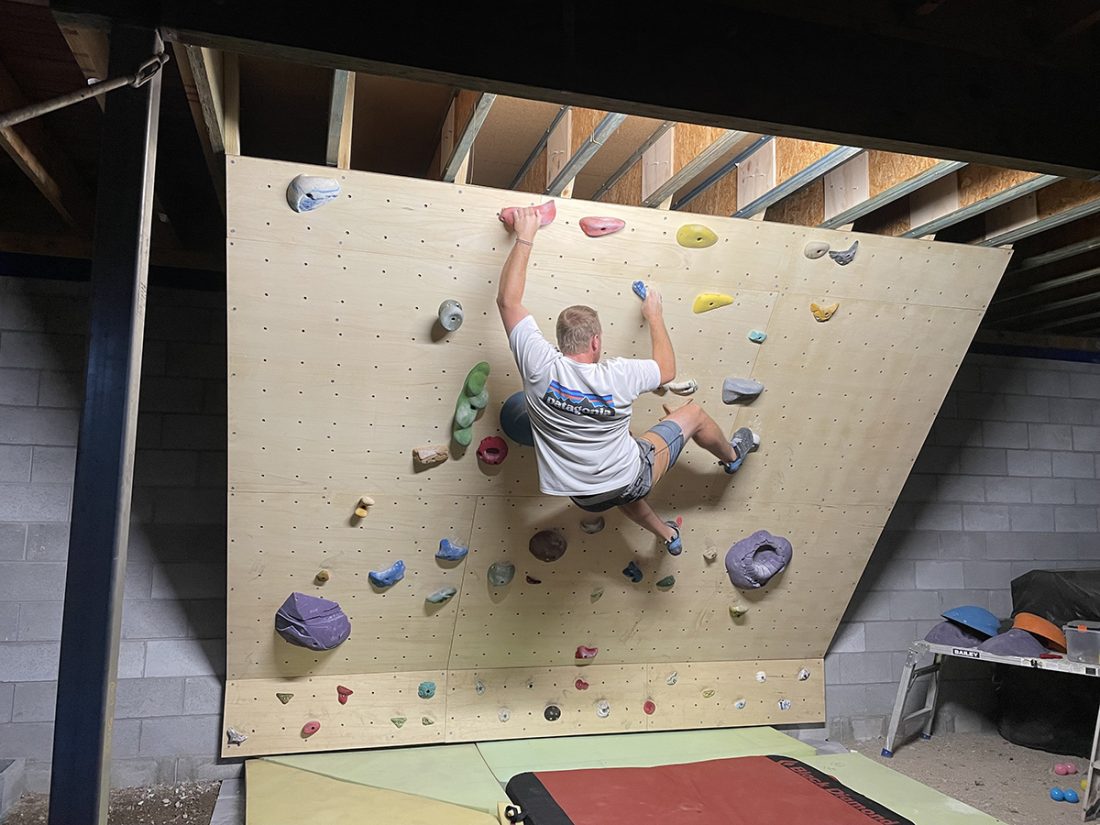
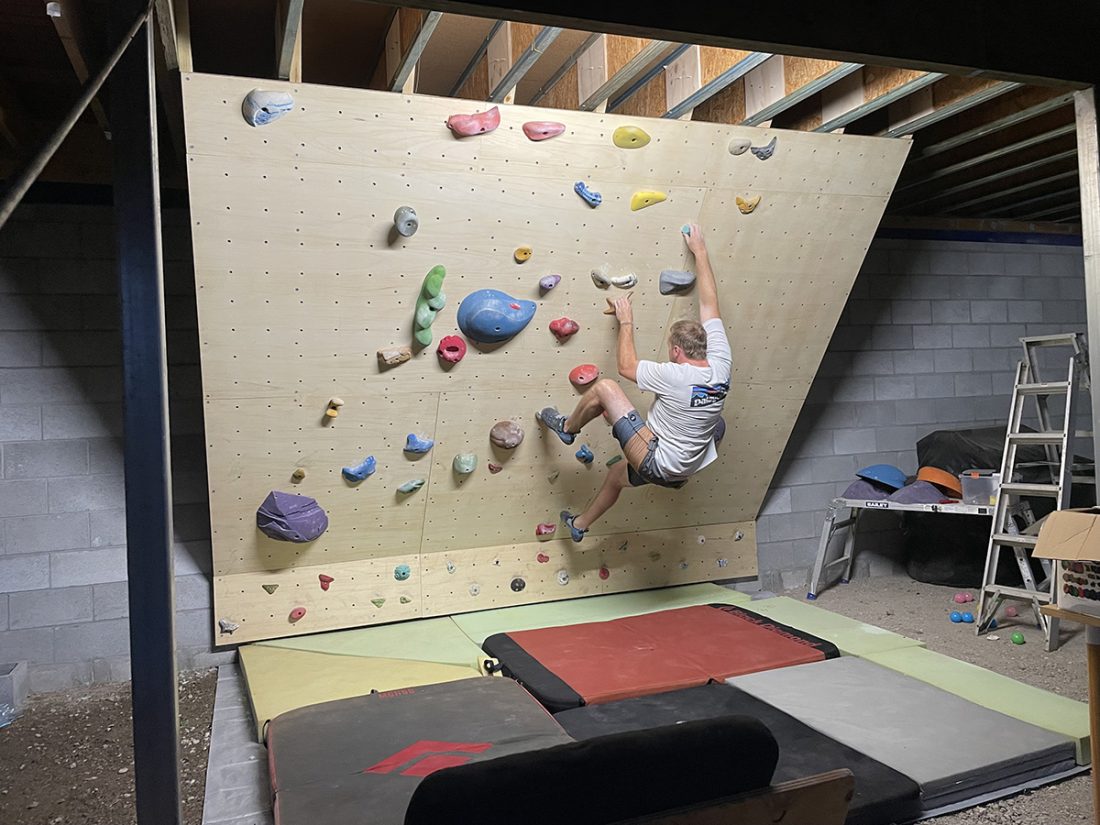
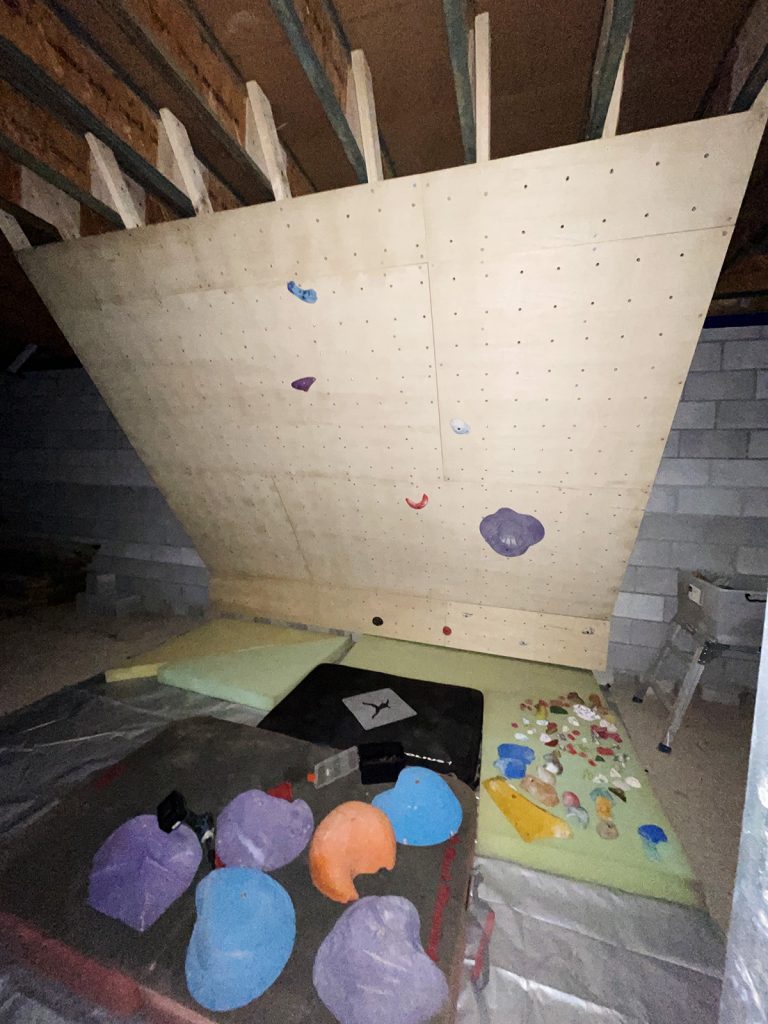
Regardless of how your wall is to be built, you will need to determine what size you want it and what angle you want it to be set at. I wanted my woody to be a decent size. I’ve climbed on some home walls in the past that are the usual 2.4m wide and I’ve found they just get boring real quick. A wall of that size is cost efficient, though, as the plywood comes in 2.4×1.2m sheets, so it’s definitely a good option for a home wall on a budget. But you need to figure out if you want to go, and can afford to go, a bit bigger.
After doing the maths on the angle and working out the dimensions from that, I opted for 3.6m/2.5 sheets of ply wide x2.8m/2.5 sheets of ply high with a 400mm kick board. Make sure you figure out the angle first up. I wanted mine to be around 35 degrees, which I have found to be the right amount of steep for me; my original plans, however, had the wall sitting around 47 degrees, which is just way too steep for what I wanted (Moonboards are set at 45 degrees as a point of reference). With the dimensions and angle sorted, I scribbled down a design, ran it past a couple of chippy mates, and after a few tweaks, I knew exactly how it was going to be built and could therefore determine the materials required.
With a bit of experience in estimation, I jotted down a list of materials needed to get the job done; I was confident I had it all covered. The costs added to around $1,500 just for materials to build the wall, not including holds, mats or T-nuts. This cost can be reduced severely if you want to build a woody on a budget. For example, I opted for the expensive 18mm marine ply over form ply which is more than double the price ($200 a sheet in fact!), but I wanted that quality finish as I was kind of going all out on this. Form ply is black and is also marine grade but has a very slippery surface and I have just found it not enjoyable as climbing wall material,so I bit the bullet on the expensive stuff (I’m glad I did). I did up a shopping list, convinced myself with a quick “fuck it” in my head, and choofed off to Bunnings. I should note that I also opted for 90x45mm treated pine framing timbers instead of 70x35mm as again, I wanted the wall to be solid, and it would mean I would need less bracing which means less work.
Seeing as the framing for your woody is dependent on how you’re building yours (ie freestanding, bolted to a wall like mine, concreted in place etc), I won’t go into the details of how to build the framing, but here’s a few photos of how mine went together. One thing I will note, however, is that you need to make sure there is a piece of timber (a noggin) where your ply sheets join so that you can fix the ends of the sheets to something to avoid weak spots and potentially cracking the ply in these locations.
Once the framing was up, it was time to get the ply prepped. This is where I hit my first roadblock, “What T-nut spacings do I go with?” I did a bit of research online and just ended up super confused about it all. “Do I do them at 200mm spacings? Do I off-set every second row?”I decided to dry fit the ply sheets with the help of a neighbour (18mm plywood weighs a bloody tonne FYI!) by screwing them in place with the 100mm batten screws; this way I could mark out the T-nut spacings that I was thinking of using and get a visual representation of it.
Hot tip: Fit the kick board sheets first and make sure they are level;that way you can sit the bottom sheets of the main part of the wall on top of them to give you some support when screwing them in place.

I decided to go with 200mm horizontal spacing x150mm vertical spacing with every second row offset. But this was quickly scrapped after a visit to the gym, where I measured their T-nut spacings at 150mm which just looked right. I got home, wiped the grid I had marked clean, then flicked a new grid with a chalk line over the whole wall at 150mm spacings. Before removing the plywood, I marked the back of each sheet with its location on the wall (ie BR for bottom right etc). At this point, I knew how many T-nuts I would need (which was a whopping 460!) and got them on order. I opted for the Metolius screw in T-nuts over the hammer-in ones, too, as I know they are a better product and have less issues (but here is another point where you can save some $ and also a heap of extra work). The screw in T-nuts are probably double or triple the price ($40 for a box of 100) and require two screws in each one, so the 460 holes I was about to drill meant I was going to have to put in 920 small screws by hand. Another “fuck it” repeated in my head, and I started drilling the holes as per the grid I had marked out. I used a 12mm drill bit for the T-nuts, but in hindsight should have used 13mm or even 14mm. It doesn’t matter if they are slightly oversized, as it just means it will be easier to locate the thread inside the hole when putting your holds up once you’re done. If you really want to save some time and money, don’t put any T-nuts in. You can just use timber screws to fix your holds to the wall if you want. It’s just a little more effort putting holds up, but will save you a lot of time and heartache during the build process. You will need to drill extra holes in your holds to fit them this way, but most of the time you need to add at least one hole anyway as a lot of the residential holds don’t have the extra hole for a set screw, which is a screw that is used to stop holds from spinning when you’re standing on them or holding them. If you’ve had a hold spin on you before you know how much it sucks!
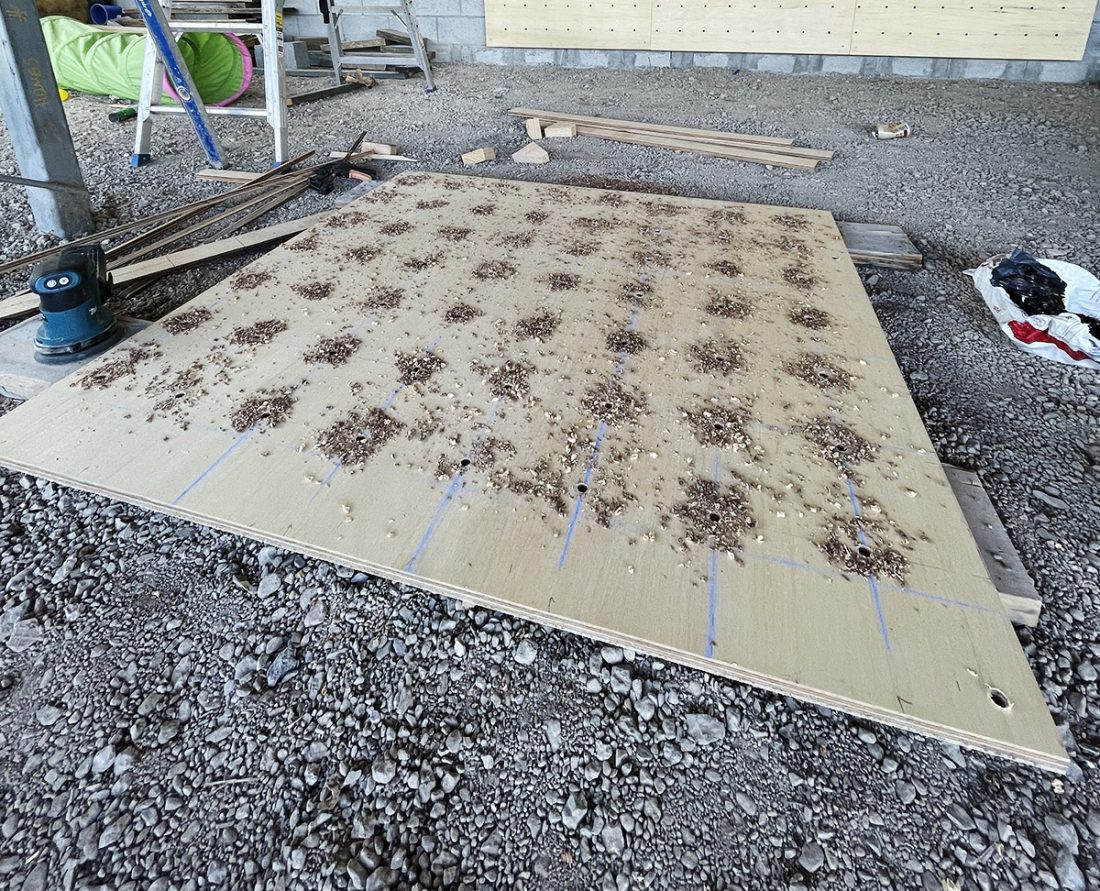
If you’re up to this part of the build, it’s time to drill the holes for the T-nuts (all 460 of them for me). Before you go all gung-ho and start drilling holes, make sure you drill them from the side on which the holds will be fixed, not from the back! The face you start drilling into will leave a clean hole, but the back side will very likely get damaged from the pressure of the drill and will blow out a little. I did the holes one sheet at a time due to the patterns not lining up sheet to sheet but if yours line up perfectly, feel free to drill more than one sheet at a time. Just be sure they line up before you do. It should go without saying but just in case it doesn’t, don’t drill your sheets while they are sitting on the ground. Elevate them on something, otherwise you’re going to get a blunt drill bit and likely damage something. (Side note:I initially started drilling pilot holes but quickly got sick of that as I had so many holes to drill, so I just took the 12mm bit straight to it after about the first 20 holes.)
After I drilled all the holes in a sheet, I gave it a once over with the orbital sander on both sides, and made sure each hole was properly drilled out before attaching the T-nuts. If you’re like me and have gone with the screw in T-nuts, I hope you’re ready as it’s time to put nearly a thousand screws in! If you went with the bash-ins, revel in your glory. When you’re finished T-nutting, screw all the sheets back to the wall in the location they were in when you dry fitted them. It should be easier to fit them this time round as the existing screw holes should locate very easily. As each sheet goes on, you can put a little pencil mark where the frames are so that you know where to screw into once all the sheets are on. Screw each sheet off properly along each frame, at least 4-6 screws down each frame and along the ends with the 100mm batten screws. Because you did so well at putting some timber where each ply sheet join is, screw these off too. I didn’t use liquid nails when screwing my sheets on as I know I will be pulling this wall down in the next 12-24 months and moving it, so I want to be able to take it apart easily. If yours is staying put, feel free to glue before you screw.
It was at this point that I realised I had managed to save an extra sheet of plywood, and that I could take it back for a $200 refund. I had estimated that the kickboard and the little bit at the top of the wall would need to be made out of two sheets but was able to do it from one, so I was pretty stoked about that… money for holds!

The wall is basically done now, so step back and the look at the beautiful piece of art you have created. Pretty marvellous, right? Now it’s time for the fun (but also expensive) part: buying some holds. After scrounging around left over holds from friends’ old woodies, I realised that a wall of this size is going to need a lot of holds! Thankfully, I was gifted about 80 or so from a mate whose woody went to woody heaven some years ago,and whose holds have been sitting in a box in my garage since then. It was a trip down memory lane pulling all those familiar old holds back out of the box after a few years of neglect! I put aside my favourite ones, promptly set my first route, and then did a victory climb. The wall didn’t collapse — a win!
Depending on your style, angle of the wall, ability and goals, hold choice is a personal decision. You can make a system board, a scatter board, or just set problem after problem until the wall is full. There’s a tonne of ways to set your woody. I opted for the latter, and once the wall is covered it will become a scatter wall with a bunch of set routes as well. I went and bought another 100 holds from Climbing Anchors, which was made up of the all-rounder and good value option of the Metolius 60-hold residential pack (which FYI comes with the hammer in T-nuts… der!), as well as a pack of screw on footers, a 15-pack of mini jugs and a 15-pack of modular holds that I liked the look of. Again, this is a personal choice, so do what you want here, but holds can be very expensive so be savvy. There are a range of suppliers you can get them from in Oz. As I said, I got mine from Climbing Anchors, but there’s also Wild Earth, Climb ICP, Pinnacle Sports, Awesome Woodys, Mont Adventure Equipment, Big Johns, Uncarved Block, Project Climbing and Friction Addiction to name a few. As for T-nuts, these can also be sourced from a few of the retailers mentioned above. Don’t forget to check with your local climbing gym, too, as they regularly sell off old holds on the cheap. Oh, and as for bouldering pads, they can be expensive if buying new; think about buying your mate’s pad that they haven’t used in five years, or seeing if your local gym has off cuts of old foam from their matting. Or even still, scrounge up some old mattresses from marketplace and chuck a moving blanket over top of them… whatever makes for a soft landing.
Having completed the wall now, it’s definitely been a worthwhile exercise. The actual act of building the woody wasn’t that hard or time consuming. Most of theeffort went into planning and design, but once I’d figured that out, it was just a matter of putting in bolts, cutting and screwing timbers, and putting the thing together; it didn’t take all that long. It cost me around $1700 all up including holds and pads, and its rad!
Remember, you can make this project as big or as small as want, and there are many cost saving options for penny pinchers. If you’ve been thinking about building a home woody but haven’t been sure where to start, this is your sign! It’s time to turn your home climbing dreams into reality.
CONTRIBUTOR: Adventure photographer and filmmaker Nathan McNeil can usually be found camera-in-hand at the crags around SE Queensland. He is an Ambassador for WildEarth.com.au